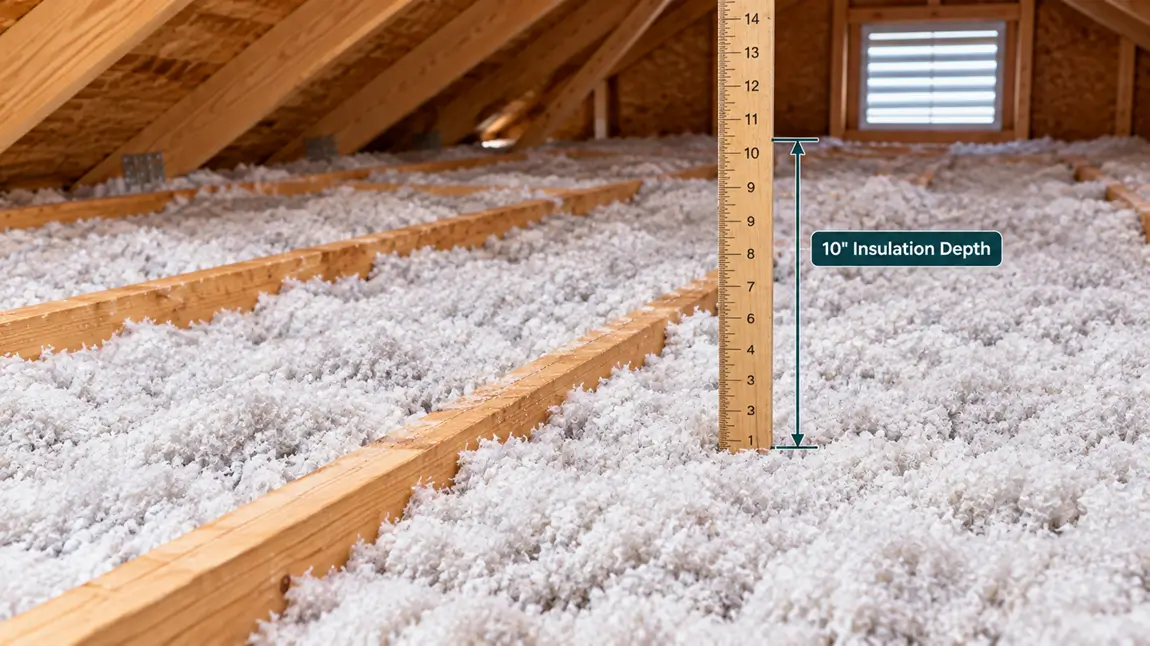
To insulate an attic, seal the air leaks in the attic floor first, put baffles at the eaves so the soffit vents stay open, then add blown-in insulation or unfaced batts across the attic floor until you reach your target R-value, which is R-38 to R-60 for most US homes. Finish by insulating and weatherstripping the attic hatch. On an open attic floor that’s easy to reach, most homeowners can do the whole job in a weekend.
Blown-in insulation is the easiest way to top up an existing attic, because it fills the gaps around joists, wires and pipes and goes on deep and fast with a rented blowing machine. This guide walks through each step, compares the main types of attic insulation and shows how deep each one needs to be. To count the bags and depth for your own attic, use our blown-in insulation calculator.
Before you start: check your attic
Look around the attic with a flashlight before you buy anything. Fix these problems first, or call a pro:
- Vermiculite insulation. It looks like light brown or silver-gray pebbles that pour like gravel. Much of it came from a mine that also held asbestos, so the EPA says to assume it contains asbestos and leave it undisturbed. Hire an asbestos professional before any work that would disturb it.
- Knob-and-tube wiring. Old wiring run on ceramic knobs shouldn’t be buried in insulation. Have an electrician check or replace it first.
- Moisture or mold. Wet insulation, dark stains on the roof sheathing or soft, rotten wood point to a roof leak or poor ventilation. Fix the cause before you insulate.
- Fans that vent into the attic. Bathroom, kitchen and dryer vents must run all the way outside, not stop in the attic.
- Recessed lights. Lights that aren’t rated IC (insulation contact) need clearance around them or an approved cover.
- Little or no ventilation. Without soffit vents and ridge or gable vents, moisture builds up in the attic.
ENERGY STAR’s do-it-yourself guide to sealing and insulating lists the same warning signs and recommends a contractor when you find them.
Tools and materials
- Insulation: bags of blown fiberglass or cellulose, or unfaced batts
- A blowing machine, rented or borrowed from a home center, often free when you buy enough bags
- Baffles (rafter vents) for each rafter space that has a soffit vent
- Canned spray foam, caulk and rigid foam board for sealing
- Sheet metal and fire-rated, high-temperature caulk for gaps around chimneys and flues
- Depth rulers, or strips of cardboard marked in inches
- A few boards or plywood strips to kneel and walk on
- A work light, a utility knife and a straightedge
- Safety gear: an N95 or better respirator, goggles, gloves, long sleeves and a hat
How to insulate an attic step by step
- Measure the attic floor and pick a target. Multiply the length by the width, measured inside the outside walls. Our R-value chart by climate zone shows the R-value your area needs.
- Make a safe path. Lay boards across the joists to kneel and walk on. Never step between the joists, because the ceiling drywall below won’t hold you. In summer, work early in the day, when the attic is coolest.
- Seal the air leaks. Insulation slows heat but doesn’t stop air, so seal first. The table below shows what to seal and how.
- Install baffles at the eaves. Staple a baffle between the rafters at each soffit vent, so outside air can still flow into the attic once the insulation is in.
- Build dams. Put a box or dam around the attic hatch so insulation can’t spill out, and use sheet metal to keep insulation back from chimneys, flues and non-IC lights by the clearance the code and the maker require.
- Mark the depth. Staple depth rulers to the joists or trusses, about one for every 300 sq ft, with the numbers facing the hatch, so you can check the depth as you go.
- Add the insulation. Start at the eaves farthest from the hatch and work back toward it. See the tips for blown-in and batts below.
- Insulate the hatch. Glue rigid foam to the back of the hatch, or cover pull-down stairs with an insulated box, and weatherstrip the edges.
How to air seal an attic
| Leak | How to seal it |
|---|---|
| Holes for wires, pipes and vents | Canned spray foam or caulk |
| Gaps along the tops of interior walls (top plates) | Caulk or spray foam along the joint |
| Open chases, dropped soffits and plumbing walls | Cover with rigid foam board or blocking, then seal the edges with foam |
| Gaps around chimneys and furnace flues | Sheet metal and fire-rated, high-temperature caulk. Never use spray foam against a flue. |
| Bath fan housings and ceiling registers | Caulk or foil tape where they meet the ceiling |
| Recessed lights | Replace with IC-rated airtight fixtures, or use covers made for the purpose |
| Attic hatch or pull-down stairs | Weatherstripping, plus a latch that pulls it tight |
Tips for blowing in insulation
- Work in pairs: one person feeds the machine and the other holds the hose.
- Hold the hose level and let the insulation fall into place. Don’t push it into the baffles or pack it down.
- Fill evenly to the depth on your rulers, and cover the tops of the joists too.
- Check the coverage chart on the bag. It gives the minimum depth and the number of bags for each R-value, and it comes first.
Using batts
If the spaces between the joists are empty, lay the first layer between them with the paper facing down toward the living space. For extra layers, use unfaced batts laid across the joists at a right angle, which covers the wood and the seams below. Butt the edges tight, cut batts to fit around wires and pipes instead of stuffing them, and never squash them, because compressed insulation loses R-value. To count batts or rolls, use the insulation calculator.
Types of attic insulation
| Type | About R per inch | Best for | DIY? |
|---|---|---|---|
| Blown fiberglass | R-2.6 | Topping up open attic floors | Yes, with a blowing machine |
| Blown cellulose | R-3.6 | Topping up open attic floors, filling small gaps | Yes, with a blowing machine |
| Fiberglass batts and rolls | R-3.2 | Empty joist spaces in easy-to-reach attics | Yes |
| Mineral wool batts | R-4.0 | Batts that resist fire and moisture | Yes |
| Open-cell spray foam | R-3.7 | The underside of the roof in an unvented attic | No, hire a pro |
| Closed-cell spray foam | R-6.5 | Roof decks and tight spaces, sealing as it insulates | No, hire a pro |
| Rigid foam board | R-4 to R-6 | Hatch covers, knee walls and sealing open chases | Yes |
For most attic floors, blown-in is the best insulation, because it goes on deep and fills around every obstacle. Cellulose gives more R-value per inch and blocks air a little better, while fiberglass is lighter and settles less over time. Both work well. The values above are typical, so check the label on the product you buy.
Blown-in vs batts
Blown-in is faster and leaves fewer gaps, especially when you’re adding to old insulation or working around wires, pipes and odd joist spacing. Batts suit empty joist spaces, small attics and anyone who doesn’t want to run a blowing machine, but every gap and squashed spot lowers their real R-value, so they take more care to fit well.
Batts vs rolls
Batts and rolls are the same material. Batts come precut, often in 4 or 8 ft lengths, which are easier to handle in a cramped attic. Rolls come in long runs that you cut to length, which means fewer seams on long, open spans.
How deep should attic insulation be?
| Target R-value | Blown fiberglass | Blown cellulose | Fiberglass batts |
|---|---|---|---|
| R-30 | 11½ in | 8½ in | About 10 in |
| R-38 | 14½ in | 10½ in | About 12 in |
| R-49 | 19 in | 13½ in | About 16 in (R-30 + R-19) |
| R-60 | 23 in | 16½ in | About 20 in (two layers of R-30) |
Blown-in depths are settled depths at about R-2.6 per inch for fiberglass and R-3.6 for cellulose, rounded to the nearest ½ inch. Products vary, so follow the coverage chart on your bag if it differs. When you add to old insulation, count the R-value of what’s already there and only add the difference.
How to insulate an attic door or hatch
An uninsulated hatch is often the biggest single leak in the attic floor. For a lay-in hatch, glue two or three layers of rigid foam board to the top of the panel, add weatherstripping where it sits on the frame, and build a dam around the opening so the attic insulation stays put when you open it. For pull-down stairs, weatherstrip the frame and cover the opening from above with an insulated box or a zip-up attic stair cover.
Should you remove old insulation first?
Usually not. If the old insulation is dry, clean and not crushed, leave it and add new insulation on top. Blown-in insulation can go right over old batts or loose fill. Remove it only when it’s wet, moldy, soiled by rodents or other pests, or damaged by smoke or fire, or when you need open access to seal a badly leaking attic floor. Removal is usually a pro job done with a large vacuum, and vermiculite should never be removed by a homeowner.
When you add to old insulation, use loose fill or unfaced batts. Faced batts or plastic sheeting laid on top can trap moisture between the layers.
Insulating the roof rafters or using spray foam
Most attics are insulated on the floor, which keeps the attic itself cold and ventilated. Insulating the underside of the roof instead makes sense when the attic is a finished room, or when it holds a furnace and ductwork you want inside the heated space. That usually means spray foam on the underside of the roof deck, which creates an unvented attic that must meet the code rules for that design, so it’s a job for an insulation contractor. If you put batts between the rafters of a vented roof, use baffles to keep an open air channel from the soffit to the ridge.
DIY or hire a pro?
Do it yourself when the attic floor is open, there’s enough headroom to move around, and air sealing is simple. Hire a pro for spray foam, insulation removal, vermiculite, knob-and-tube wiring, very low or cramped attics, attics with many recessed lights, and any moisture problem. To compare the two, enter your bag price and blower rental, or a contractor’s price per square foot, in the blown-in insulation calculator.
Worked example: blown fiberglass vs cellulose
Say your attic floor is 40 × 25 ft with 3 inches of old loose fiberglass, and you want to reach R-49. These are the default numbers in the blown-in insulation calculator:
- Attic area: 40 × 25 = 1,000 sq ft
- Existing insulation: 3 in × R-2.5 per inch = about R-7.5
- R-value to add: 49 − 7.5 = R-41.5
| Blown fiberglass | Blown cellulose | |
|---|---|---|
| R-value per inch | 2.6 | 3.6 |
| Depth to add | 16 in | 11½ in |
| Total depth | About 19 in | About 14½ in |
| Weight, with 10% extra | About 662 lb | About 1,296 lb |
| Bags | 24 bags of 28 lb | 52 bags of 25 lb |
| Depth rulers | 4 | 4 |
Cellulose needs less depth for the same R-value, but it weighs about twice as much, so it takes more bags. Bag sizes and coverage vary by brand, so enter your bag weight, or the coverage from the bag’s chart, in the calculator.
Heavy attic insulation adds weight to the ceiling below; our guide to drywall thickness explains when ceilings need 5/8-inch or sag-resistant board.
Frequently asked questions
How thick is R-30 insulation?
R-30 fiberglass batts are about 10 inches thick, and high-density R-30 batts for tight spaces are about 8¼ inches. Blown-in R-30 is about 11½ inches of fiberglass or 8½ inches of cellulose after settling.
Can you put new insulation on top of old insulation?
Yes, if the old insulation is dry and clean. Use loose fill or unfaced batts, and don’t lay faced batts or plastic on top, which can trap moisture. Leave vermiculite alone and call a pro.
Should you insulate the attic floor or the roof?
Insulate the floor in most homes with an unfinished, vented attic. Insulate the roof only when the attic is a living space or holds the furnace and ducts, and that is usually a spray foam job for a contractor.
Do you need a vapor barrier in the attic?
Usually not as a separate layer on the attic floor. When you put paper-faced batts into empty joist spaces, the facing goes down toward the heated room. Never add a vapor barrier on top of existing insulation. Rules vary by climate, so check your local code.
Can you blow in insulation yourself?
Yes. Home centers often lend or rent the blowing machine, and the job goes best with two people: one feeding the machine and one holding the hose. Seal the air leaks and set up baffles and depth rulers before you start.
How long does it take to insulate an attic?
For a typical attic, plan a weekend. Air sealing usually takes the longest, often most of a day. Blowing in the insulation for a 1,000 sq ft attic takes a few hours with two people.
Insulation rules vary by climate zone and local code, and products differ, so follow the label, the manufacturer’s instructions and your building department. Get a pro for vermiculite, old wiring, moisture problems or spray foam.
Keep reading
 Walls, Ceilings & LightingPaint Sheens Explained: Flat, Eggshell, Satin, Semi-GlossPaint sheen is how shiny the dried paint looks. From least to most shiny, the common sheens are…Read the guide →8 min read
 Walls, Ceilings & LightingDrywall Thickness: Which Size Goes WhereThe standard drywall thickness for walls is ½ inch, and it is the most common board in homes.…Read the guide →7 min read
 Walls, Ceilings & LightingWhat R-Value Insulation Do I Need? Chart by Climate ZoneThe R-value you need depends on your climate zone and where the insulation goes. As a quick guide…Read the guide →9 min read